How to setup LTI on your LMS
Overview
This article provides instructions for configuring Getmarked
Digitaliser as an
LTI 1.3 app on Learning Management Systems (LMS).
Note: Please ensure that the LMS supports deployment of external apps with the LTI 1.3 standard.
General Instructions for Configuring LTI on your LMS
The following steps are general instructions applicable for any LMS like Canvas, Blackboard
or Moodle. For specific instructions on individual LMS, please refer to the LMS specific
instructions in the subsequent sections.
-
Please create a LTI Tool Instance on your LMS by providing the following
information to it. LMS that supports LTI will have an interface for you to input
these in. These information tells your LMS where to load our app from.
Login URL
 :
Redirection URL:
RSA key:
JWKS:
:
Redirection URL:
RSA key:
JWKS:
- Please obtain a Client ID / Developer Key from your LMS.
- Register your LMS platform and Client ID / Developer Key on GETMARKED Digitaliser developer portal.
Note: While different LMSes may have slightly different steps for configuring LTI apps, the
steps should generally not deviate too much from the above. If you
encounter any problems with specific LMSes, please do not hesitate to contact us.
Configuring LTI on Canvas
Skip Step 1 below if you have an account manager working with you to setup the LTI integration. Proceed to step 2.
-
Step 1Register and login as a developer on GETMARKED Digitaliser. At login, from the Developer Portal → Deploy LTI tool on LMS.
- Select Canvas (Cloud) under LMS Platform.
- Set the Tool Name. This is for your own reference and can be anything. We recommend it be the name of your school or organization.
- Skip Client ID and Deployment ID. You will fill it up later.
- Set Canvas Instance URL to the URL of your Canvas site. Usually it's something like "https://harvard.instructure.com"
-
If you have filled in the form properly, it should look something like this:
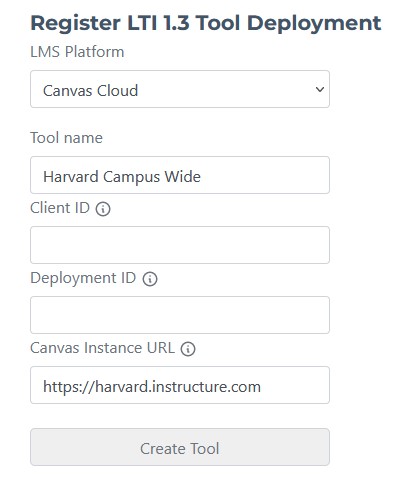
- Click Create Tool.
-
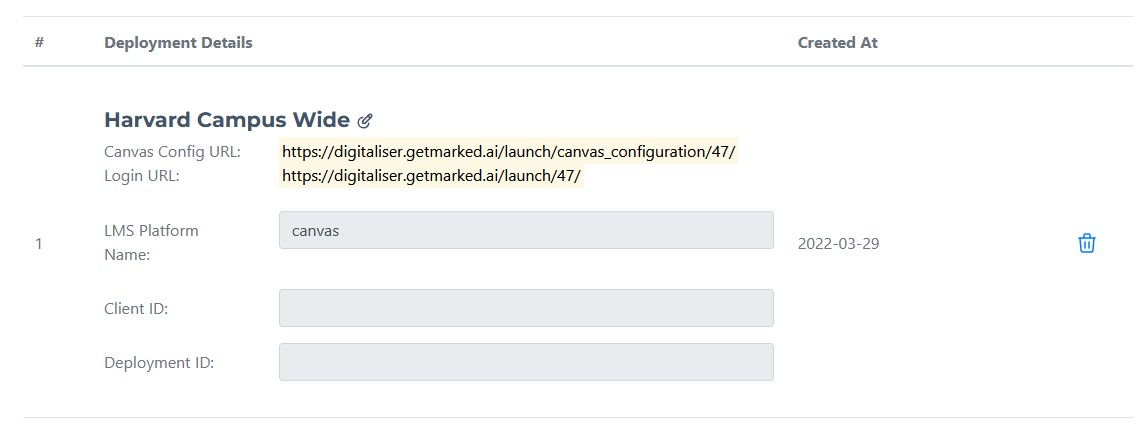
Copy the Canvas Config URL, it would be used in the next step.
-
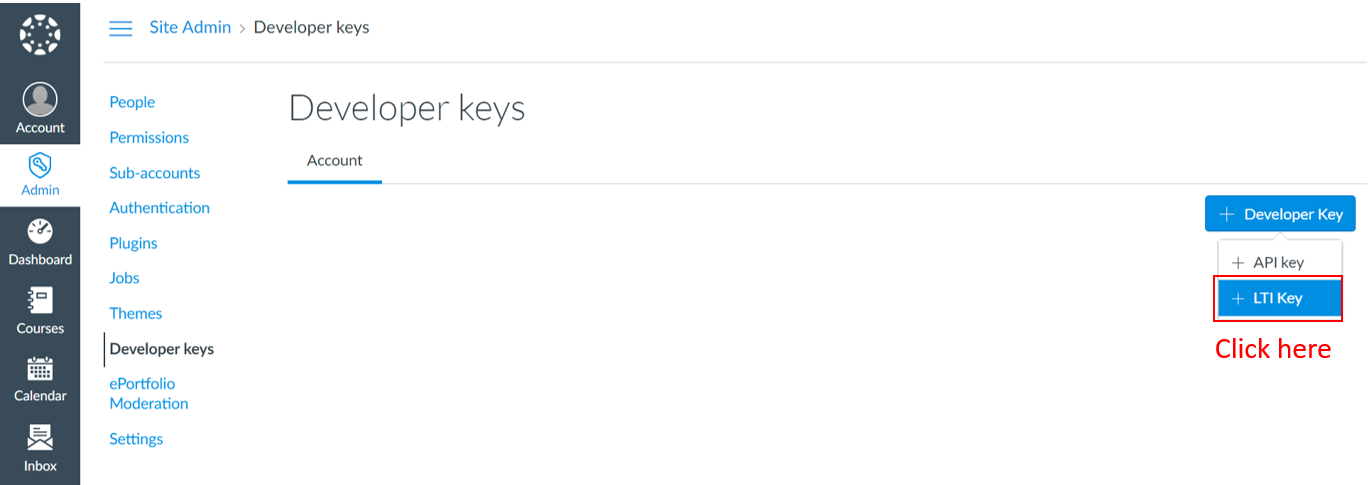
Step 2Next, we need to create a Developer Key in Canvas. Login to Canvas. Go to Admin → Developer keys. Click on the + Developer Key button, then click on the + LTI Key.
-
Under Configure → Method, choose Enter URL, and paste the Canvas Config URL from the previous step into
into the JSON URL field.
It will look something like so (where XXX will be unique to you):
https://digitaliser.getmarked.ai/launch/canvas_configuration/XXX/ - Set Redirect URIs to https://digitaliser.getmarked.ai/launch/authenticate/
- You may set Key name and Owner email to whatever you like. It is for your own reference.
-
Click on save, and you should be able to see your created Developer Key. Turn on the state to On, and copy the key under Details.
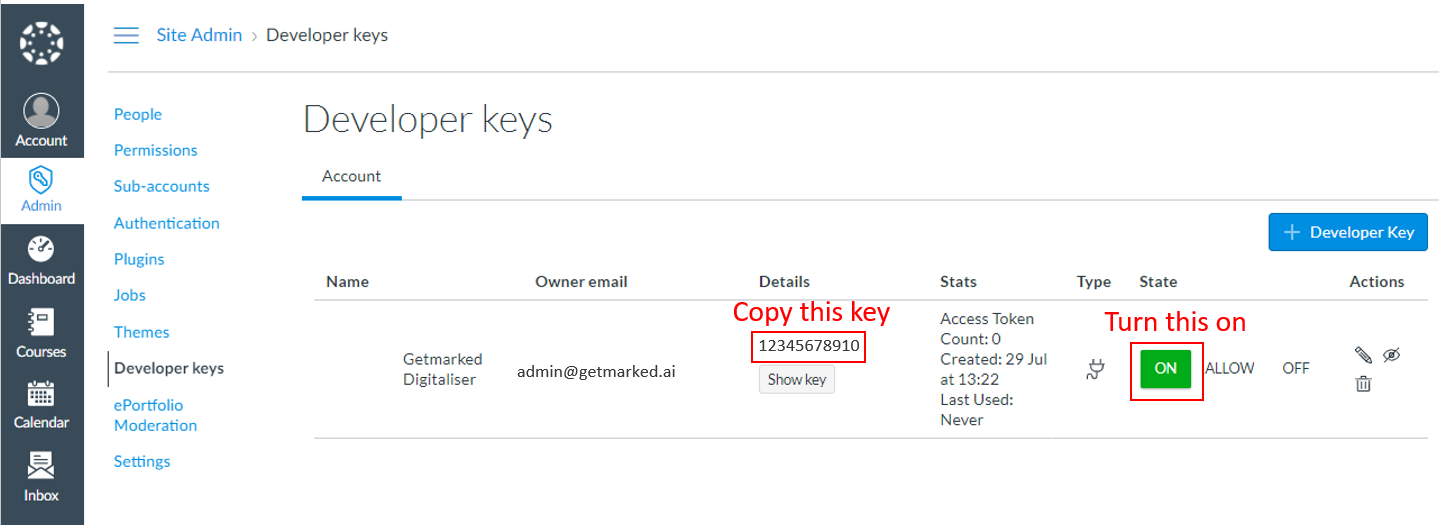
Your set up should look like this: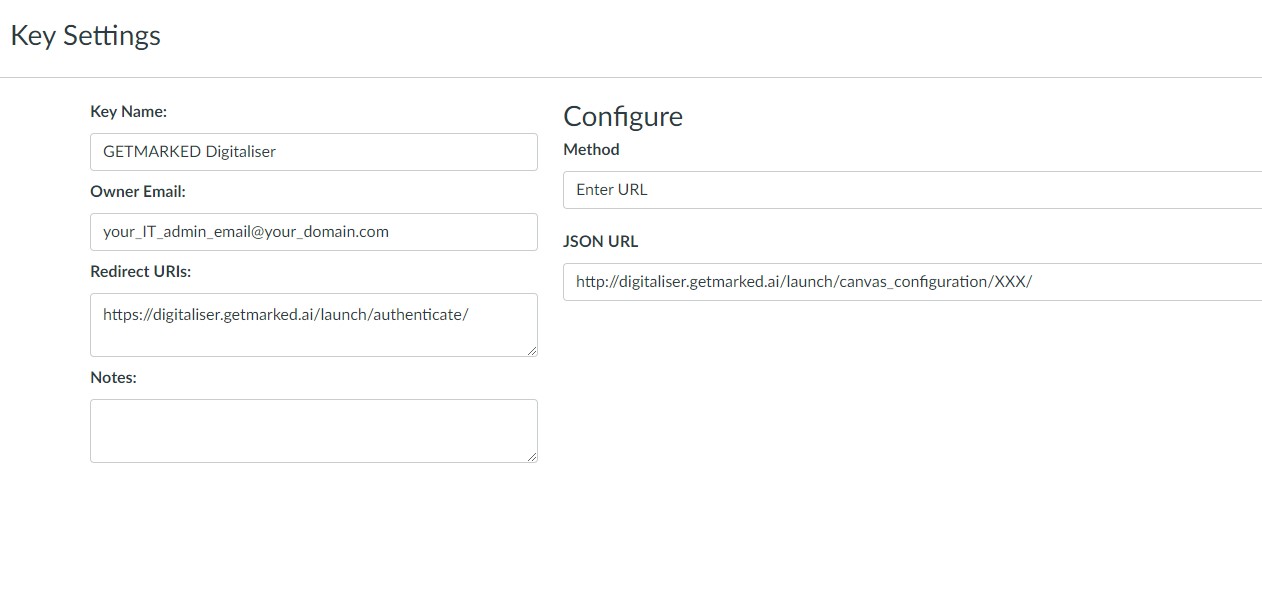 Note: You will need to be a site administrator in order to access the above settings.
 -
Under Configure → Method, choose Enter URL, and paste the Canvas Config URL from the previous step into
into the JSON URL field.
-
Step 3Go back to the Deploy LTI tool on LMS page in your GETMARKED Developer Portal and register your Developer Key (Client ID).
- Click on the edit icon right beside your Platform Name (this in example "Harvard Campus Wide").
-
You should see that the Client ID field is now editable.
Paste the Developer Key you have obtained from Canvas in the previous step into this field.
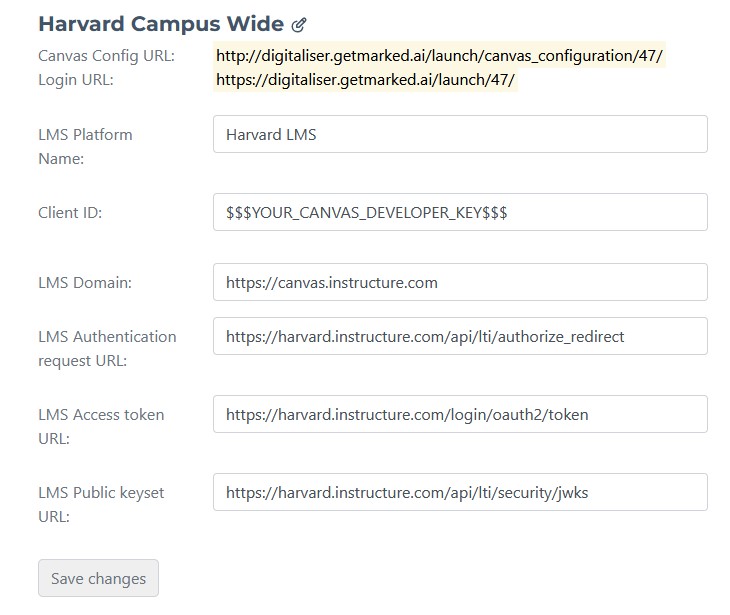
- Click save changes. Our tool is now connected to the canvas platform.
-
Step 4Installing GETMARKED Digitaliser tool to course.To install globally, complete step 4 in
site admin- In Canvas, go to the course you want to add the tool to. Click on Settings → Apps → (View App Configurations →)+ App.
- Under Configuration Type, choose By Client ID, and key in the Developer Key (this is a string of numbers) that you copied earlier.
- Click submit and install the app.
- GETMARKED Quiz Importer should appear on the left sidebar menu on your course page.
Configuring LTI 1.3 on Schoology
The following steps needs to be carried out by the Schoology site Admin:
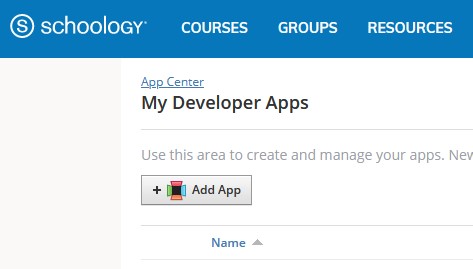
- Login as admin, then go to Apps Center → My developer Apps.
-
Click on the + Add App button.
-
Fill in the App Name, Description, Category. These fields would be presented to instructors and can be anything you like. We suggest the following:
- App Name: GETMARKED Quiz Importer
- Description: GETMARKED quiz importer helps teachers reuse their quiz questions from any learning platforms. You can import and export quiz questions between Word doc, Kahoot, Quizizz, Quizlet, Blooket, Gimkit, Google Forms and Schoology.
- Category: Technology
- In Recommended For, select Instructors and Admins
- In Available for, select Only People in my School
- In Type of App, select LTI 1.3 App
- UNCHECK Launch App in Schoology
- In Can be installed For, select where users will be able to access the app (e.g. Users, Courses, Groups). We suggest selecting Users but it's up to your preference.
- In Privacy, keep it unchanged with the default of Send Name and Email/Username of user who launches the tool.
- In LTI Advantage Extensions, Click the checkbox for Deep Linking to enable it.
-
Copy and paste the following values:
- JWKS URL: https://digitaliser.getmarked.ai/launch/public_keys/
- Domain/URL: https://digitaliser.getmarked.ai/launch/authenticate/
- OIDC Login Init URL: THIS-WILL-BE-PROVIDED-BY-YOUR-ACCOUNT-MANAGER
- Redirect URLs: https://digitaliser.getmarked.ai/launch/authenticate/
- Click the checkbox for This application meets the Schoology Terms of Use.
-
Your configuration page should look something like this:
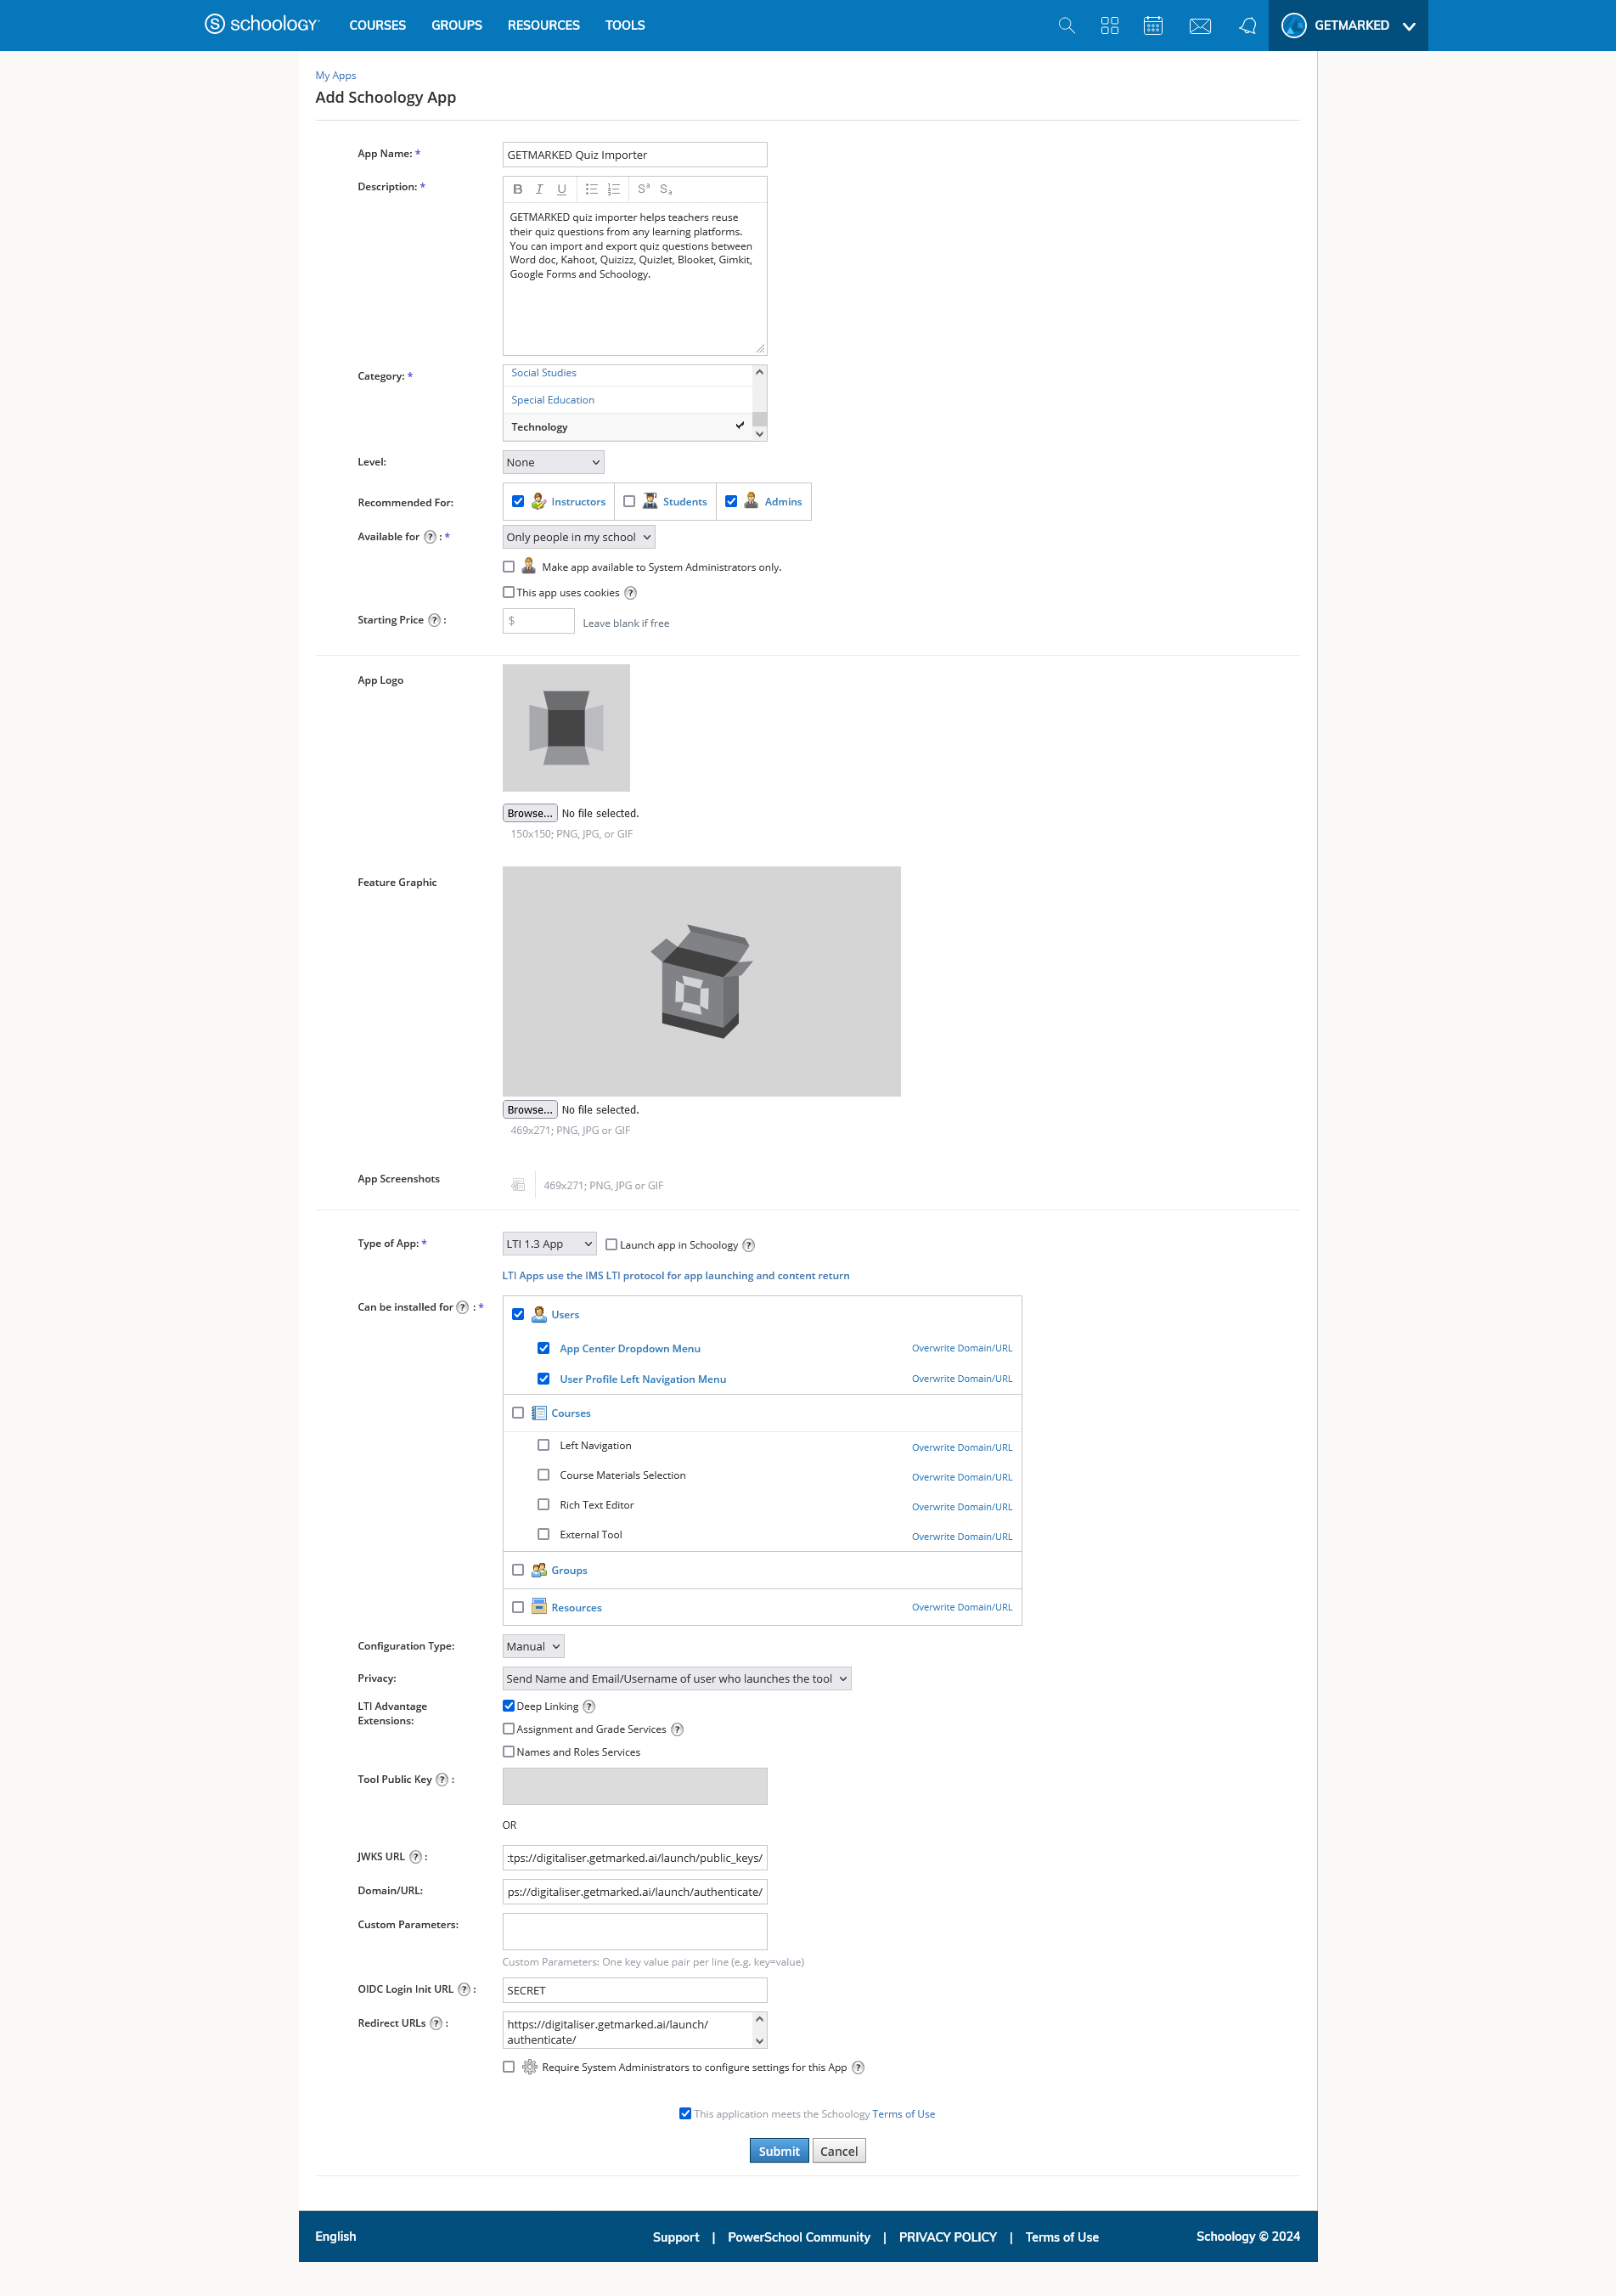
- Click the blue Submit button at the bottom of the page.
-
You would be redirected to the App Profile Page of the app you just created. Click Option → API Info.
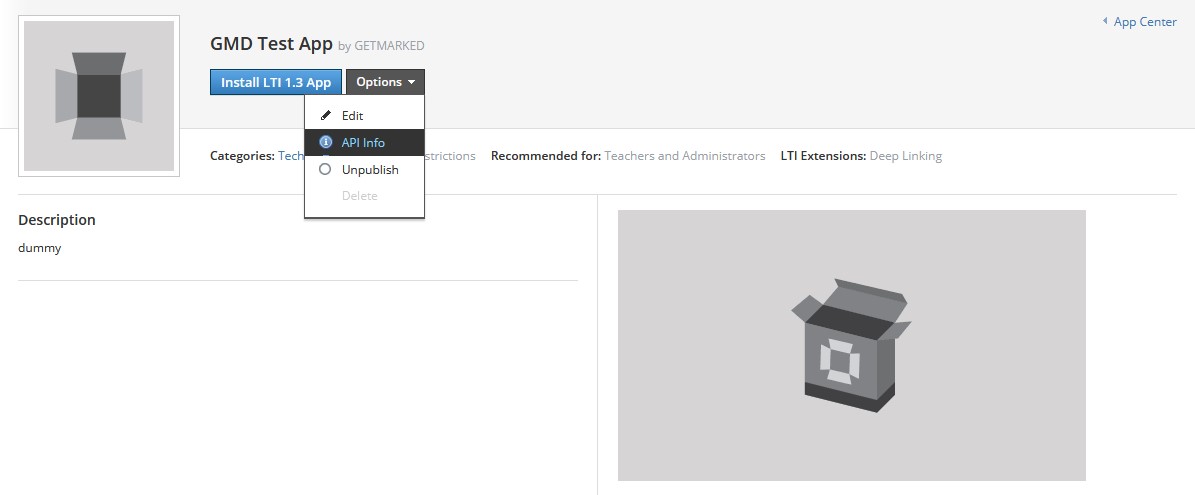
- Copy the Client ID under LTI 1.3 App and send it back to your GETMARKED account manager. The Client ID should be a string of numbers.
- In the same App Profile Page you are on, Click the Install LTI 1.3 app blue button.
- Click I Agree, to authorize access to Schoology by the LTI app.
- Click Continue.
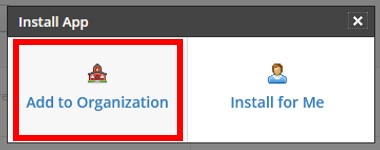
-
Click Add to Organization and you would be redirected to the Organization Apps Page.
-
Click on Install/Remove blue button of the newly created app.

-
Check the box for All Users and UNCHECK Parent and Student. Boxes for Teachers and System Admin should remain checked.
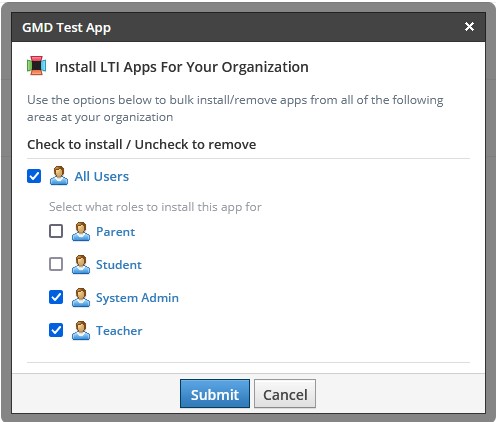
- Click Submit
- You would be redirected to the Organization Apps page again.
- Click Configure.
- Copy the Deployment ID and send it back to your GETMARKED account manager.
Configuring LTI 1.3 on Blackboard
Setting up an LTI 1.3 integration on Blackboard with GETMARKED Digitaliser is straightforward.
Get your Learn Admin to enter our Client ID in your Admin Panel. You should get back a Deployment ID. Email it to support@getmarked.ai and we will setup it up for you in less than one business day.
Our Blackboard Client ID is: 6a696831-387f-4906-bc09-932ffff78ff8
Reference: Blackboard's LTI regsitration and deployment page
Our Blackboard Client ID is: 6a696831-387f-4906-bc09-932ffff78ff8
Reference: Blackboard's LTI regsitration and deployment page
Configuring LTI 1.3 on Brightspce by D2L
Setting up the LTI 1.3 integration on Brightspace with GETMARKED Digitaliser consist of a
Registration step and a Deployment step.
Registration
- Login into Brightspace using your admin account
- Click on Settings icon, then click Manage Extensibility.
- Click on LTI Advantage tab and click Register Tool.
-
Enter the following information into the Register Tool Form:
- Name: GETMARKED Digitaliser (can be anything, for your own reference)
- Description: GETMARKED Digitaliser (can be anything, for your own reference)
- Domain: https://digitaliser.getmarked.ai/
- Redirect URLs: https://digitaliser.getmarked.ai/launch/authenticate/
- OpenId Connect Login URL: https://digitaliser.getmarked.ai/launch/
- Keyset URL: https://digitaliser.getmarked.ai/launch/public_keys/
- Under Extensions, Check Send Institution Role.
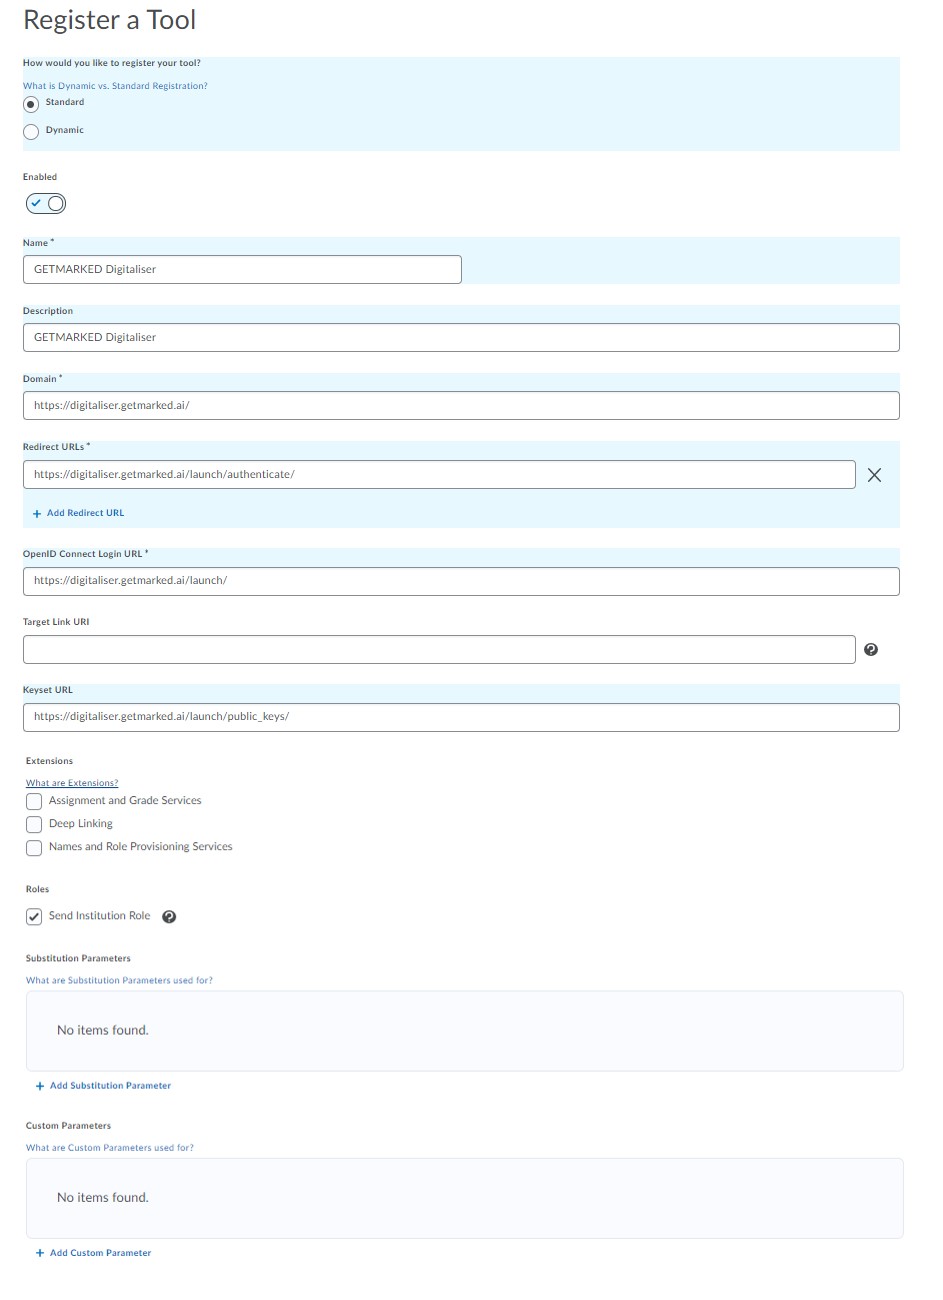
- Once you have registered GETMARKED Digitaliser as an LTI 1.3 tool, Brightspace will expose a set of configurations that are needed to complete the registration on our side. Please copy and paste this data and send it back to us. Also please include a screenshot so that we can verify that everything is correct.
Deployment
- In D2L go to: Gear Icon → External Learning Tools → LTI Advantage → New Deployment
- “Tool“ choose the tool that you just registered
- Enter the “Name“ what you want
- In Security Setting Check “Org Unit Information“, ”User Information” and “Link Information“
- Click “Add Org Units” and choose which course can use this tool and click Add
- Click “Create Deployment”
-
Create Link by clicking View Links → New Link
- Enter “Name“ what you want
- Copy https://digitaliser.getmarked.ai/launch/authenticate/ to "URL"
- Click “Save and Close” button
- Go to Course that you want to add tool to
- Click “Content” in top navigation in course
- Under Table of Contents click the module that you want to add the tool too (you may need to Add a module)
- Click Existing Activities → External Learning Tools → Choose the Link you just created
- Click the link to the tool that was added
- GETMARKED Digitaliser should launch
Configuring LTI on Moodle
-
Create a Client ID in Moodle. Login to Moodle. Go to Site administration →
Plugins. Under Activity modules,
go to External tool → Manage tools.
- Click on configure a tool manually.
-
Tool Settings
- Set Tool name to what you want. This is for your reference and it can be anything.
- Select LTI 1.3 under LTI version.
- Copy the Redirection url located above to both Tool URL and Redirection URI(s).
- Copy the Login url located above to Initiate login URL.
- Under Public key type on Moodle, select either RSA key or Keyset URL. Copy the appropriate values from the corresponding field type located above (either RSA key or JWKS) into the Public keyset field on Moodle.
- Select Show as preconfigured tool when adding an external tool under Tool configuration usage.
- Select Embed, without blocks under Default launch container.
- Click Save changes. You should now be able to see your added tool listed under Tools.
-
Obtaining Client ID. Click on
 of your tool
and you will be able to copy the Client ID, the Platform ID, Authentication
request URL, Access token URL and
Public keyset URL from the popup.
Note: An example of what the popup should look like:
of your tool
and you will be able to copy the Client ID, the Platform ID, Authentication
request URL, Access token URL and
Public keyset URL from the popup.
Note: An example of what the popup should look like: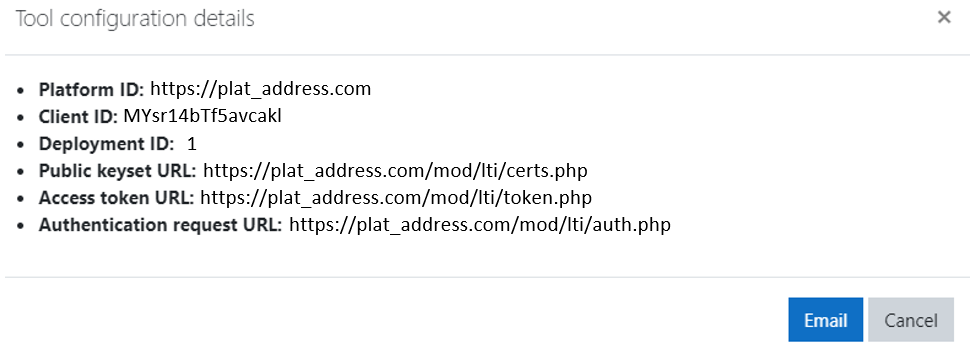
Here are some examples of the required fields from a moodlesite:Field Example Platform IDhttps://plat_address.comClient IDMYsr14bTf5avcaklAuthentication request URLhttps://plat_address.com/mod/lti/auth.phpAccess token URLhttps://plat_address.com/mod/lti/token.phpPublic keyset URLhttps://plat_address.com/mod/lti/certs.phpNote: You will need to be a site administrator in order to access the above settings. -
Registering Client ID on Getmarked Digitaliser. Login to Getmarked Digitaliser as a
developer account. Go to portal → Deploy LTI
tool on LMS.
- Select Others under LMS Platform.
- Set Platform Name to the name of your Moodle Platform name. This is for your own reference and it can be anything.
- Copy Platform ID that you copied earlier to Domain.
- Copy Authentication request URL, Access token URL and Public keyset URL that you copied earlier to the corresponding fields.
- Set Tool name to what you want. This is for your own reference and it can be anything.
- Enter in the Client ID that you copied earlier to Client ID.
-
If you have filled in the form properly, it should look something like this:
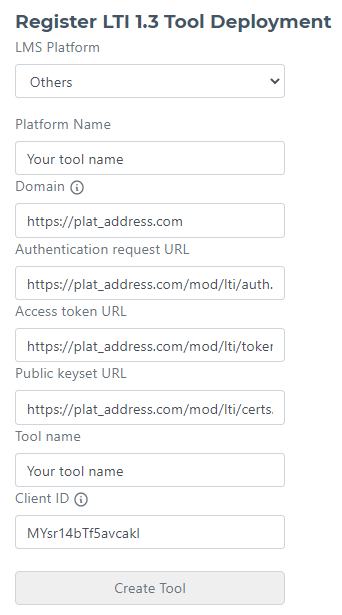
- Click Create Tool. You should now be able to see your registered Tool. Your tool is now connected to the Moodle platform.
-
Adding Getmarked Digitaliser tool to course.
- In Moodle, go to the course you want to add the tool to. Click on Turn editing on → Add an activity or resource.
- Under Preconfigured tool, you should be able to select the Getmarked Digitaliser tool that you set up earlier.
- Give your activity a name. You can leave the rest of the fields blank.
- Click Save and return to course.