Iframe embedding on your custom learning platform
Overview
Iframe embedding of GETMARKED Digitaliser is done using
LTI 1.3 and in
this section we will walk you through how to implement it. In this documentation, we will
refer to your application as a Platform and GETMARKED Digitaliser is a tool or an app or a widget.
Understanding LTI 1.3 Authentication Flow
GETMARKED Digitaliser is implemented as an LTI 1.3 app on platforms (LMS or otherwise).
Therefore, the work-flow between your platform and GETMARKED Digitaliser needs to
comply with LTI 1.3 specifications
as well as the IMS Security Framework 1.0.
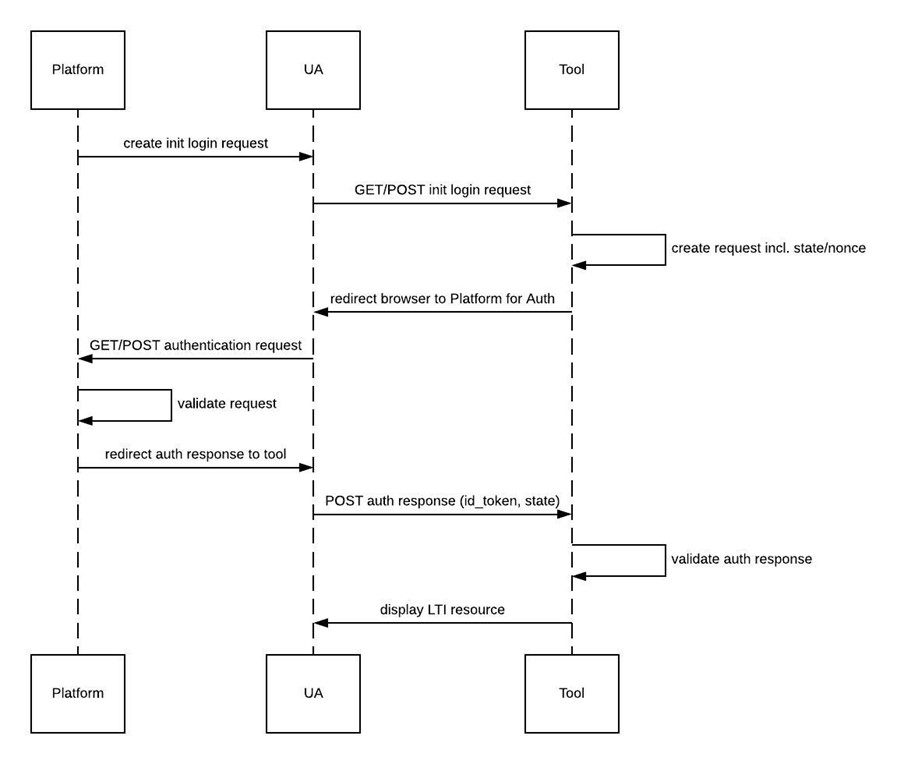
Specifically, the authentication of the user’s details between
your platform and GETMARKED Digitaliser uses the OpenID Connect Protocol.
The following diagram shows a high level view of how the OIDC flow takes place in LTI 1.3:
Getting Started
Your platform will need the following to get started:
- Authentication Request Endpoint
- Client ID
This is the endpoint which GETMARKED Digitaliser will make a HTTP GET request to
after the initial HTTP POST request from your platform.
The HTTP GET request will contain authentication parameters sent by
GETMARKED Digitaliser, which you will authenticate,
before carrying out the final pass of the authentication.
If you require the multiple unique deployments of GETMARKED Digitaliser app at
different
locations of your platforms, you may need multiple deployment instances.
Every deployment instance of GETMARKED Digitaliser
should have its own Client ID, generated by you. This is how we will
recognise the identities of HTTP requests. Client IDs should be mixed-case
alphanumeric string that is between 20 to 30 characters.
Registering Platform and Client ID on GETMARKED Digitaliser
In order for GETMARKED Digitaliser to accept the OIDC authentication, your platform’s details needs to be registered with us.
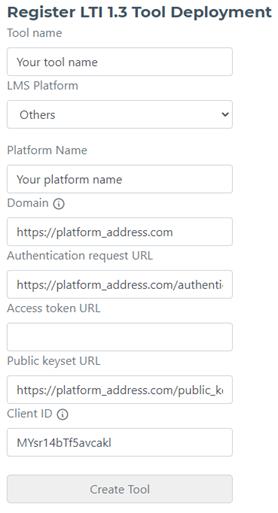
Login to GETMARKED Digitaliser with a developer account. Go to portal → Deploy LTI tool on LMS.
- Set Tool name to what you want. This is for your reference and it can be anything.
- Select Others under LMS Platform.
- Set Platform Name to the name of your Platform. This is for your own reference and it can be anything.
- Key in your platform’s domain to Domain. Your platform domain can be a URL of any part of your web application. However it must match the iss value provided in step 1.
- Key in your platform’s Authentication Request URL to the Authentication request URL field.
- You may leave the Access token URL field empty for now.
- Key in your platform’s JSON Web Key Set (JWKS) to the Public keyset URL field.
- Enter in the Client ID that you have created to Client ID.
- Click Create Tool. You should now be able to see your registered Tool listed.
Note: Every unique deployment instance of Getmarked Digitaliser needs to be registered
again. In such cases, repeat the above processes while using a different Client ID for every
unique deployment.
If you have filled in the form properly, it should look something like this:
Step 1: Create HTTP POST request to initiate Login
The login process begins with you sending an HTTP POST request to
https://digitaliser.getmarked.ai/launch/ from a form on a webpage.
This HTTP POST request would require the following key-value data in its form-data:
# Value associated with your platform. Please use your platform main domain address.
# Eg. http://your_domain_address.com
“iss” =>
“<<your domain address>>”
# Getmarked digitaliser’s authenticate url.
“redirect_uri” =>
“https://digitaliser.getmarked.ai/launch/authenticate/”
# Unique token generated by your platform. Used to associate all requests with this user session.
# Should be a random alphanumeric string that is between 20-30 characters
“login_hint” =>
“<<login-hint>>”
# Client ID must match the value registered on GETMARKED Digitaliser. See Getting Started Above.
# This is the identifier for this deployment instance
“client_id” =>
“<<unique-client-id>>”
Here is an example of a html form that sends the required launch parameters to GETMARKED
Digitaliser’s OIDC endpoint upon clicking of the “Launch LTI 1.3 Tool” button. The LTI app
will be rendered in the iframe below it.
<form action=
"https://digitaliser.getmarked.ai/launch/"
method="post"
target="getmarked_tool">
<input type="hidden" name="iss" id="iss" value="{{ iss }}" >
<input type="hidden" name="login_hint" id="login_hint" value="{{ login_hint }}" >
<input type="hidden" name="client_id" id="client_id" value="{{ client_id }}" >
<input type="hidden" name="target_link_uri" id="target_link_uri" value="{{ target_link_uri }}" >
<button type="submit">
Launch LTI 1.3 Tool
</button>
</form>
<iframe src=
"about:blank"
width="700"
height="600"
name="getmarked_tool"
title="Getmarked Tool"
><iframe>
Step 2: Authenticate Reply from GETMARKED Digitaliser
Upon receipt of HTTP POST request, GETMARKED Digitaliser will authenticate the request
and if successful, will make a HTTP GET request
to your platform’s Authentication Request URL, which includes the following query
parameters:
# OIDC and LTI 1.3 required parameters
“scope” =>
“openid”
“response_type” =>
“id_token”
“response_mode” =>
“form_post”
“prompt” =>
“none”
# Unique Client ID that was passed earlier. Identifier for this deployment instance
“client_id” =>
<<unique-client-id>>”
# Getmarked digitaliser’s authenticate url that your platform will next authenticate with.
“redirect_uri” =>
https://digitaliser.getmarked.ai/launch/authenticate/”
# random alphanumeric string that is between 20-30 characters. This is a unique token associated with this request and used later to prevent CSRF.
“state” =>
<<nique-state-token>>”
# random alphanumeric string that is between 20-30 characters. This is a unique identifier to be used to prevent replay attacks.
“nonce” =>
<<unique-nonce>>”
# Same login_hint that was passed earlier.
“login_hint” =>
“<<login-hint>>”
Note: The GET request will look something like:
GET /your_auth_url?scope=openid&response_type=id_token&response_mode=form_post&... etc.
You should validate the GET request, by checking that the:
- required OIDC params are present
- login_hint is the same as the current user session
- client_id is the same as the deployment instance’s
- redirect_uri is “https://digitaliser.getmarked.ai/launch/authenticate/”
- nonce has not been used before.
Step 3: Final Authentication
Your platform will need to issue one final HTTP POST request to the redirect_uri (https://digitaliser.getmarked.ai/launch/authenticate/),
by building a JWT with a payload, and sending it together with the state in form-data:
# jwt containing all the payload. See below for further details.
# Eg. “eyJ0eXAiOiJKV1QiLCJhbGciOiJSUz… 2EXNFS9WgMINmnXvPfOXn5g”
“id_token” =>
<<JWT>>”
# random alphanumeric string received in the previous request. This is a unique token received in the previous GET request.
“state” =>
<<nique-state-token>>”
The JWT’s payload need to contain LTI 1.3 params such as user details and context info. The JWT should
be encoded and signed as a
JWT using RSA256 and your platform’s private JWKS. GETMARKED Digitaliser will verify the
token using your platform’s public keyset URL (see getting started).
While there are many types
of params outlined in LTI 1.3 specification, Getmarked Digitaliser will require only the
following claims:
- iss
- sub
- aud
- iat
- exp
- jti
- given_name
- https://purl.imsglobal.org/spec/lti/claim/roles
Here is an example of the LTI claims with their values within the JWT payload.
# Value associated with your platform. Please use your platform main domain address.
# Eg. http://your_domain_address.com
“iss” =>
“<<your domain address>>”
# User id / identifier that your platform uses for the current user who is accessing the LTI app.
# This should be unique to every user and should not change.
# Must not exceed 255 ASCII characters in length.
“sub” =>
“<<user id on your platform>>”
# The aud is the Client ID that was used earlier. The Client
ID must match the value registered on GETMARKED Digitaliser. See Getting Started above.
“aud” =>
“<<unique-client-id>>”
# Timestamp for when the JWT was created.
# Timestamp should be given in epoch timestamp format.
“iat” =>
“<<epoch timestamp of JWT creation>>”
# Timestamp for when the JWT should be treated as having expired.
# Timestamp should be given in epoch timestamp format.
“exp” =>
“<<epoch timestamp of expiry>>”
# Used to identify the JWT token.
# Should be a random alphanumeric string that is between 20-30 characters
“jti” =>
“<<unique identifier for the token>>”
# Name of current user who is accessing the LTI app.
“given_name” =>
“<<name of user>>”
# Role of user who is accessing the app.
# For administrators use: “http://purl.imsglobal.org/vocab/lis/v2/membership#Administrator”
# For teachers use: “http://purl.imsglobal.org/vocab/lis/v2/membership#Instructor”
# For students use: “http://purl.imsglobal.org/vocab/lis/v2/membership#Learner”
“https://purl.imsglobal.org/spec/lti/claim/roles” =>
“<<role of user>>”
# Note: Check http://www.imsglobal.org/spec/lti/v1p3/#lis-vocabulary-for-context-roles for full list of roles
Step 4: GETMARKED Digitaliser is displayed
If all validations have passed, the launch will be successful and Getmarked Digitaliser will
be displayed in your platform. If the user is an administrator/instructor, he will be
directed to the main portal where he can convert documents and create quizzes. If the user
is a student, he will be directed to the assignments portal where he can attempt assignments
set by his teacher.